Using Currents with Connected System Owner Accounts
Use connected system owner accounts to get started with Currents right away, and let Currents handle the majority of the SREC trading experience for system owners.
Introduction
A Connected System Owner Account is an account on Currents where the system owner provides their SREC trading information, allowing Currents to sell the system owner's SRECs on their behalf.
This product is designed for Installer SaaS vendors to integrate into their customers' (installers') platforms. By integrating with Currents, installers can offer their system owners a "Sell SRECs via Currents" button in their dashboard, enabling system owners to easily sell their SRECs.
Get Started
If you're new to Currents, start with this guide to enable installers to invite system owners to create connected accounts, so Currents can manage SREC sales on their behalf.
How to Use the Onboarding Process for Connected System Owner Accounts
-
Ensure Installers are Registered and Customize Installer Profiles
Before you begin, ensure that each installer is registered in Currents. You can use the Currents API to create and customize settings for each installer, including branding elements like company name, color, and logo. This information is used to provide a branded experience for system owners during the onboarding process.
- Use the
/v1/installersendpoint to create or update installer profiles. - Customize visual elements like company name, color, and logo for each installer.
- Store the
installer_idreturned by the API for use in subsequent steps. - The
idfield in the response is theinstaller_idyou'll need to associate system owners with the correct installer. - This
installer_idensures system owners see the appropriate branding during the onboarding process.
- Use the
-
Create a New Connected Account
Use the
/v1/system-ownersendpoint to create a new connected account for the system owner and obtain the account ID. You can prefill information on the account object for the system owner before generating the system owner link.- Include the
installer_idparameter to associate the system owner with the correct installer. - Note: After you've created the new account, check to see that the account appears in your Currents Dashboard.
- Include the
-
Generate an System Owner Link
Call the
/v1/system-owner-linksendpoint to create a link for the system owner to complete the onboarding process. You'll need to provide the following parameters:account: Use the account ID returned from the previous step.refresh_url: The URL to redirect the system owner to if they need to restart the onboarding process.return_url: The URL to redirect the system owner to after they complete the onboarding process.- Include the
installer_idparameter to ensure the system owner experiences the correct branding and settings associated with their installer.
-
Redirect the System Owner to the System Owner Link URL
In your platform's onboarding flow, redirect the system owner to the
urlreturned by the System Owner Links API. This link takes them through the Currents onboarding process to provide their SREC trading information. -
Handle Additional Account States
Monitor the status of the system owner's account and redirect them to the onboarding flow again if necessary. For example, if they didn't complete the onboarding process or if there are outstanding requirements.
-
Optional: Add Additional Procedures
You can add additional procedures to the onboarding flow, such as setting up notifications or integrating with other services, through the Currents Dashboard.
Example Flow: Sunrise Solar
This example shows how Sunrise Solar, a fake solar installer we made up for demonstration purposes, integrates Currents SREC services into their customer experience. The flow starts with the homeowner's pre-connection view in the installer's dashboard, guides them through Currents' onboarding process including welcome, solar usage connection, ownership verification, terms acceptance, and payment setup screens, and ends with the fully integrated post-connection dashboard view showing SREC tracking and trading information. Note that Sunrise may be using a third-party installer SaaS platform (like Sunvoy) to provide the homeowner's view with their white-labeled branding.
1. Homeowner's Third-Party Dashboard - Pre-Connection
The homeowner's (or system owner's) view of their solar system dashboard (typically provided by their installer's white-labeled software platform) before connecting to Currents SREC services. This is where the installer will initiate the connection process on behalf of the homeowner.
.jpg)
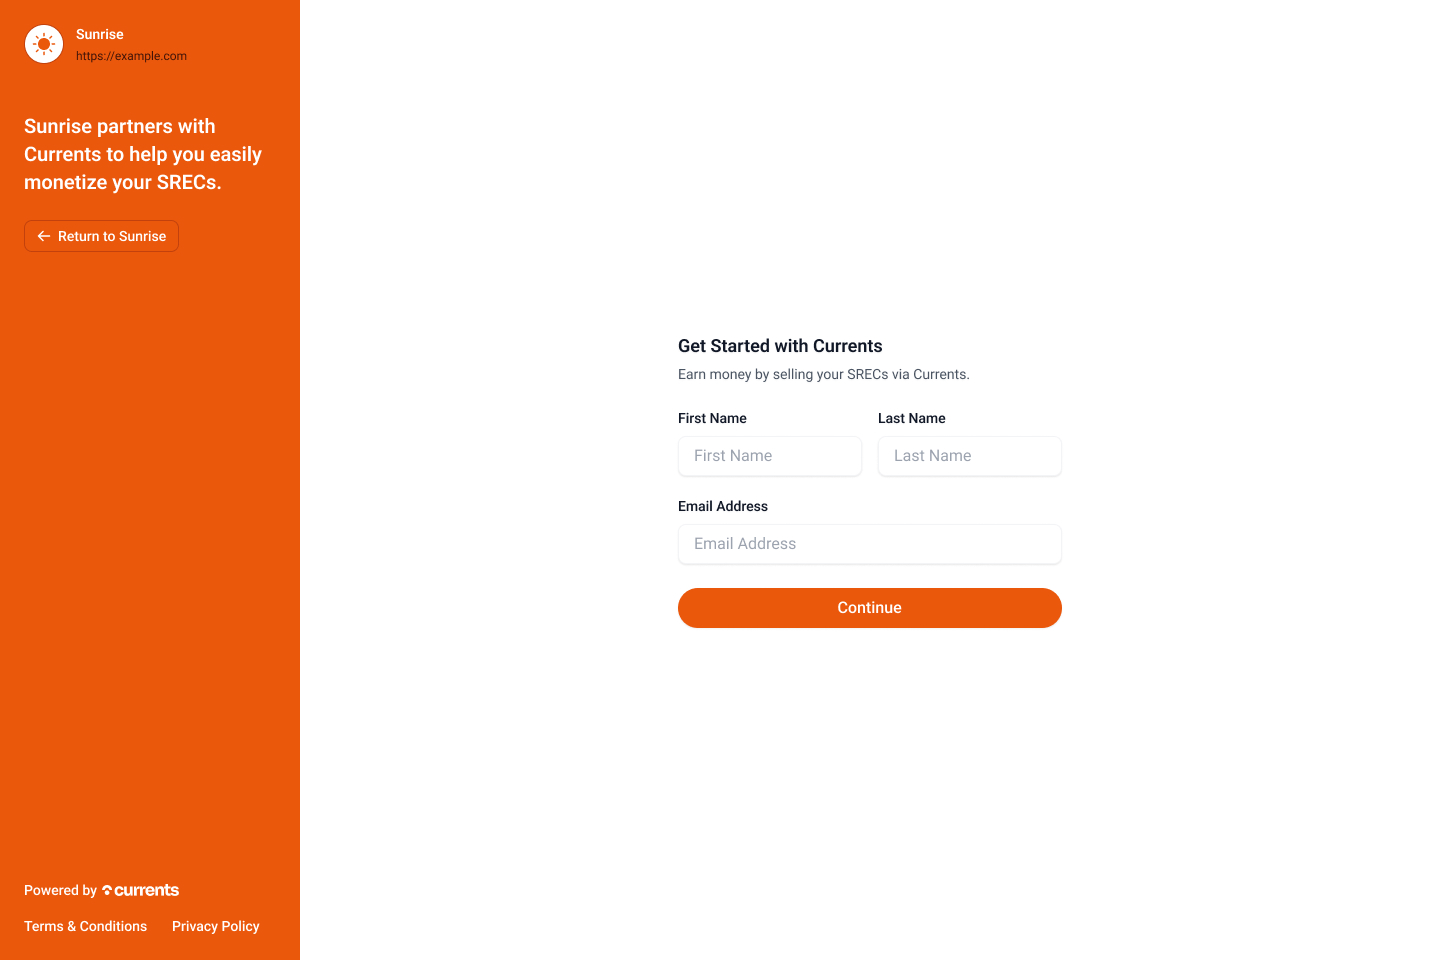
2. Currents Onboarding - Welcome Screen
The first screen system owners see when entering the Currents onboarding flow. This explains the SREC registration process and what information they'll need to provide.
3. Currents Onboarding - Connect Solar Usage
System owners connect their solar inverter data to automate SREC generation tracking and payments. This can be done through Enode integration or by providing manual documentation if needed.
.jpg)
4. Currents Onboarding - Ownership Verification
Critical step where system owners upload documentation to prove system ownership. This typically includes the installation contract, interconnection agreement, or other qualifying documents.
.jpg)
5. Currents Onboarding - Terms & Conditions
Review and acceptance of Currents' service agreement, which outlines the terms of SREC trading, revenue sharing, and platform usage requirements.
.jpg)
6. Currents Onboarding - Payment Information
System owners set up their preferred payment method for receiving SREC sales proceeds, including bank account information and payment frequency preferences.
.jpg)
7. Homeowner's Third-Party Dashboard - Post-Connection
The homeowner's (or system owner's) view of their solar system dashboard after successful Currents integration. This shows SREC generation tracking, trading status, and revenue information directly within their installer's white-labeled dashboard platform.
-1.jpg)
Create a Connected System Owner Account and Prefill Information
Use the Create System Owner API
to create a connected system owner account. You must include the installer_id parameter to associate the account with the correct installer. If you know the capabilities the account needs, you can request them when you create it.
Note: This example includes only some of the fields you can set when creating an account. For a full list of the fields you can set, such as address and email, see the Create System Owner API reference
.
Example Request
curl https://api.currents.com/v1/system-owners \
  -u "api_key:" \
  -d installer_id=YOUR_INSTALLER_ID
Prefilling Information
- If you've already collected information for your connected system owners, you can prefill that information on the account object. This includes personal information, SREC registration details, and so on.
- The onboarding process doesn't ask for the prefilled information, but it does ask the system owner to confirm the prefilled information before accepting the Currents service agreement.
- When testing your integration, prefill account information using test data.
Create an System Owner Link
You can create an system owner link by calling the System Owner Links API with the following parameters:
system_owner_id: Use the system owner ID returned by the API from the previous step.refresh_urlreturn_urlinstaller_id: Include this to ensure correct branding.
Example Request
curl https://api.currents.com/v1/system-owner-links \
  -u "api_key:" \
  -d system_owner_id={{CONNECTED_SYSTEM_OWNER_ID}} \
  --data-urlencode refresh_url="https://yourplatform.com/reauth" \
  --data-urlencode return_url="https://yourplatform.com/return" \
  -d installer_id=YOUR_INSTALLER_ID
Redirect the System Owner to the System Owner Link URL
- The response to your System Owner Links request includes a value for the key
url. Redirect the system owner to this link to send them into the onboarding flow. - You can only use URLs from the system owner links once because they grant access to the system owner's personal information.
- Authenticate the user in your application before redirecting them to this URL.
- After you create an system owner link, you won't be able to read or write their personal information. Prefill any necessary information before creating the first system owner link.
Security Tip: Don't email, text, or otherwise send system owner link URLs outside of your platform application. Instead, provide them to the authenticated system owner within your application.
Handle the System Owner Returning to Your Platform
The onboarding process requires you to pass both a return_url and refresh_url to handle all cases where you redirect the system owner to your platform. It's important that you implement these correctly to provide the best experience for your system owner.
Note: You can use HTTP for your return_url and refresh_url while in test mode (for example, to test with localhost), but you must use HTTPS in live mode. Be sure to swap testing URLs for HTTPS URLs before going live.
return_url
- Currents redirects to this URL when the system owner completes the onboarding flow.
- This doesn't necessarily mean that all information has been collected or that there are no outstanding requirements on the account. It only means the flow was entered and exited properly.
- No state is passed through this URL.
- After redirecting a system owner to your
return_url, check the state of theall_requirements_submittedparameter on their account by calling the/v1/system-ownersAPI and inspecting the returned object.
refresh_url
Your system owner is redirected to the refresh_url in these cases:
- The link expired (a few minutes have passed since the link was created).
- The system owner already visited the link (they refreshed the page, or clicked back or forward in the browser).
- Your platform is no longer able to access the account.
- The account has been rejected.
Your refresh_url should trigger a method on your server to call the System Owner Links API again with the same parameters and redirect the system owner to the onboarding flow to create a seamless experience.
Handle System Owners That Have Not Completed Onboarding
- A system owner who is redirected to your
return_urlmight not have completed the onboarding process. - Use the
/v1/system-ownersendpoint to retrieve the system owner's account and check fortrading_enabled. - If the system owner isn't fully onboarded, provide UI prompts to allow the system owner to continue onboarding later.
- The system owner can complete their account activation through a new system owner link (generated by your integration).
- You can check the state of the
all_requirements_submittedparameter on their account to see if they've completed the onboarding process.